Developing an HTML5 and JS game as a standalone application can be a murky process. Here’s how to set yourself up right and make the testing and building fairly painless.
Project Background
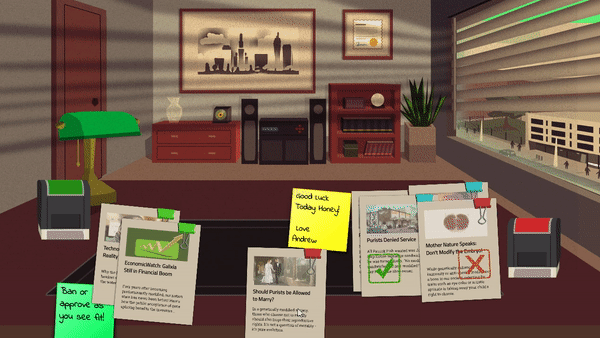
I am currently working on HEADLINER, an experimental adventure game about controlling the news, swaying public opinion and keeping your family safe. Wanting easy distribution and testing, I began prototyping as a web game. As the project grew, it exceeded my initial estimates so I started considering a releasing as an desktop game. Needless to say, I needed a standalone build, and an easy pipeline.
This tutorial is based on my own experiences and by all means not the only (or necessarily best) way to handle development. In fact, I’d love it if people commented with all the things I could do differently – always happy to learn :)
Engine and Tools
I chose to roll with Phaser, a great JavaScript engine that natively runs in a browser. I also got a few 3rd party plugins (such as debug or input fields), plus some legacy code from my earlier web prototypes.
When time came to consider a standalone build, the best option as far as I can tell is NW.JS. It’s basically a streamlined version of the chromium web browser that opens up a provided html file. In my case, simply dropping my web project in and pointing the package.json was enough to get it running.
I’ll spare you explaining how either of those tools work, the official documentation already does a good job of that. Let me get straight to setting up the environment for it.
Development Folder
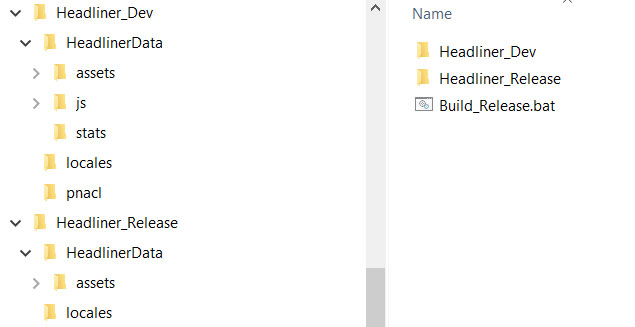
Let’s start off with an empty “root” folder that will contain everything you need. Inside it, you’ll want to create a subfolder called “Dev”, and inside it a subfolder “MyGameData.” Put all the files for your web-based game here: JavaScripts, Phaser files, graphical/audio assets, and of course, the index.html. But keep your code and your assets in two separate folders, such as “js” and “assets” respectively.
This is your main development folder. Everything is in once place and you can test directly in your browser, take advantage of Chrome/Firefox debugging tools, and whatever IDE you choose (I use Sublime). However, to allow your browser to load assets (images/audio) from your hard drive, you’ll need to pass some params. So create a shortcut to your browser similar to this:
"C:\Program Files (x86)\Google\Chrome\Application\chrome.exe" PATH\MyGameDev\Web\index_web.html --allow-file-access-from-files
Debug Standalone
Now the fun starts! In the “Dev” folder (where “MyGameData” folder lives). Drop NWJS SDK Build. Edit the package.json to point to the MyGameData/index.html file. That’s it – now your game plays both in browser and with NW.JS.
At this point you’ll like want to make numerous code changes, like adding a quit button ( nw.Window.get().close(true); ), logging errors to a file, support for resizing / fullscreen etc. Using the SDK build of NW.JS you get access to the development console (F12) and can debug the new code just as easily as in the browser.
Release Standalone
Now we need to get the standalone ready for distribution. Make a copy of index.html and call it “index_release.html.” The difference is that in the web version, you likely just include all your JS files directly. In the standalone, you’ll want to instead include the binary code file built by NWJS. More on that later, but here’s the basic code snippet to replace the manual include of all your JS files:
<script>

nw.Window.get().evalNWBin(null, 'MyGameData/MyGameJS.bin');

</script>
Next, in your root folder, create a new folder called Release and unzip all the NWJS non-SDK build files there.
Building the Release Version
So how do we get our webgame to work as NWJS standalone ready for distribution? Here’s the rough steps:
- Clear data from last build
- Create a MyGameData subfolder inside the Release Folder
- Copy the index_release.html (renaming to index.html) as well as your assets folder into Release\MyGameData (but NOT the JavaScripts)
- Copy your package.json from Dev to Release folder
- Combine all your JavaScript files into a single file
- Run NWJC.exe to compile the combined JS file into a binary (GameJS.bin)
- Move GameJS.bin to your MyGameData folder
- Play the game!
Fun little checklist to run through each time you want to test a new build, isn’t it? That’s why I made a little batch script that does this all of this for us, automatically. Just create a file titled Build_Release.bat in your root folder with the following code, adjusting to match your own project:
echo off
set DEVDIR=Dev
set SRCDIR=%DEVDIR%\MyGameDataset RELEASEDIR=Release
set RELEASEDATADIR=%RELEASEDIR%\MyGameDataecho ———————————
echo Removing Old Data files…rmdir /S /Q %RELEASEDATADIR%
mkdir %RELEASEDATADIR%echo ———————————
echo Copying Data Files…copy %SRCDIR%\index_release.html %RELEASEDATADIR%\index.html
copy %SRCDIR%\changelog.txt %RELEASEDATADIR%\
copy %DEVDIR%\package.json %RELEASEDIR%\package.json
xcopy /s %SRCDIR%\assets %RELEASEDATADIR%\assets\echo ———————————
echo Combining JavaScripts…copy /b %SRCDIR%\js\phaser.js+%SRCDIR%\js\phaser-debug.js+%SRCDIR%\js\main.js %DEVDIR%\js_built.js
echo ———————————
echo Building Javascripts Binary…cd %DEVDIR%
nwjc js_built.js MyGameJS.bin
del js_built.js
cd ..
move %DEVDIR%\MyGameJS.bin %RELEASEDATADIR%\MyGameJS.bin
pause
Phew! Now let’s explain how this works, and the lines you need to adjust it for your project.
- The SET commands just set up the paths, which should be fairly self explanatory. Set these to your folder names, if different.
- RMDIR / MKDIR – deletes old data and creates a new folder for it
- ” Copying Files…” – the COPY and XCOPY commands copy your index, assets and package.json (surprise!). Add more copy commands if you have more files you need for your game, or just stick em in the assets folder.
- “Combining JavaScripts…” – the copy command, with /b and + means it will copy and combine multiple files into one. Ideally we’d use recursive copy command with *.js wildcard to automatically fetch all JavaScript files, but in my case, I wanted to exclude some files and also be able to specify the include order. So adjust the list of JS files to combine, or do it with a wildcard
- “Building Javascripts Binary…” – this last steps runs the NWJC.exe to compile your combined JS file into the binary used by NWJS, finally moving it to your release MyGameData folder. I couldn’t get NWJC to work properly with sub folder pathnames for some reason, hence ended up using the CD commands to switch Current Directory
And that’s it! Now run the BAT file and, if you didn’t make any typos, your Release game is ready for playing. Just go inside, run nw.exe and your game should run! Well, at least it does on my end :P
So how does all this work?
So here’s what we end up with:
- Dev/MyGameData – your whole game, everything, in one place and instantly testable in a browser. Hit F5 to refresh to see code changes instantly.
- Dev – standalone build with the debug SDK, allowing you to use the NWJS console and dev tools. Great for pre-release testing features specific to NWJS, or sending to testers.
- Release – the final build you’ll want to release to your eager gamers
The whole process of going from web development, to standalone, and finally release build, becomes a matter of running the batch script. Not so daunting anymore, innit?
It also makes it easier to back up, just zip up Dev/MyGameData folder! But you should be using source control regardless.
Other Considerations
This is just the basic framework for setting up your environment, so there’s probably a few more tweaks you’d like to make such as:
- Edit your package.json for your standalone (resizable? fullscreen? toolbar? icon?) Just read the documentation
- Potentially have separate package.json for release and debug builds
- Modify your code to save console.log() calls and errors to a file
- Rename nw.exe to MyGame.exe
- Change the icon of MyGame.exe (which will require some hacking as per the documentation)
- Add a command in the batch file that also ZIPs up the release folder for easier distribution
You will also likely want to modify your code a bit to take advantage of the standalone nature of the game, such as properly resizing the game canvas to fill the window or adding a bonafide quit button. As a last nugget of wisdom, here’s a little global var I use anywhere in my code to distinguish between the web and standalone builds:
cfgIsStandalone = (typeof nw !== 'undefined') && (nw != null);
Good luck and have fun! Leave a comment if you have any other tips to add.